
Welcome to the Bulk Survey guide. Here you can find all the information on why to use bulk surveys, how to use them, and the steps that you can follow in order to distribute surveys in bulk. This user guide is meant for root-account admins as they are the only ones who have access to the bulk survey feature. If something is unclear, feel free to reach out to our support here.
Contents
What is the bulk survey feature?
How do I turn on the bulk survey feature?
How do I create a bulk survey?
Managing your bulk surveys
Embedded data and bulk surveys
- How to combine bulk surveys with Canvas blueprint?
What is the bulk survey feature?
The bulk survey feature is a method to distribute a singular survey to multiple courses. This saves time and manual actions. We do recommend using bulk surveys when you aim to distribute the same survey in 20 courses or more. Bulk surveys are great to gather student feedback after the course is completed.
2. How to turn on the bulk survey feature?
Bulk survey is a more powerful tool than the standard Canvas assignment (the most popular survey option), and that is why it is available only at the root account level. In order to use bulk survey functionality it first has to be enabled. As a root account admin you can do that by clicking the 3-dot menu on the institute surveys.

Once the menu dropdown appears, you will be able to see the settings option. Go ahead and select that option. Now you are in the Qualtrics LTI admin settings page. You can enable the bulk survey really easily by turning on the blue button right here: |


The next step is to add the time zone. To add the timezone to the app you will have to go to 'Settings' in your admin navigation of Canvas. Once on the settings page, you can find 'Apps' as one of the tabs.

Clicking on it will give you an overview of all your installed apps, including the Qualtrics integration. The next step is to click on the gear icon on the right.

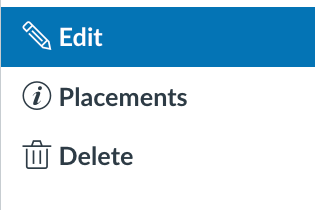
This will give you a dropdown with an 'Edit' option. When you click this, it will bring you to the settings of the app.
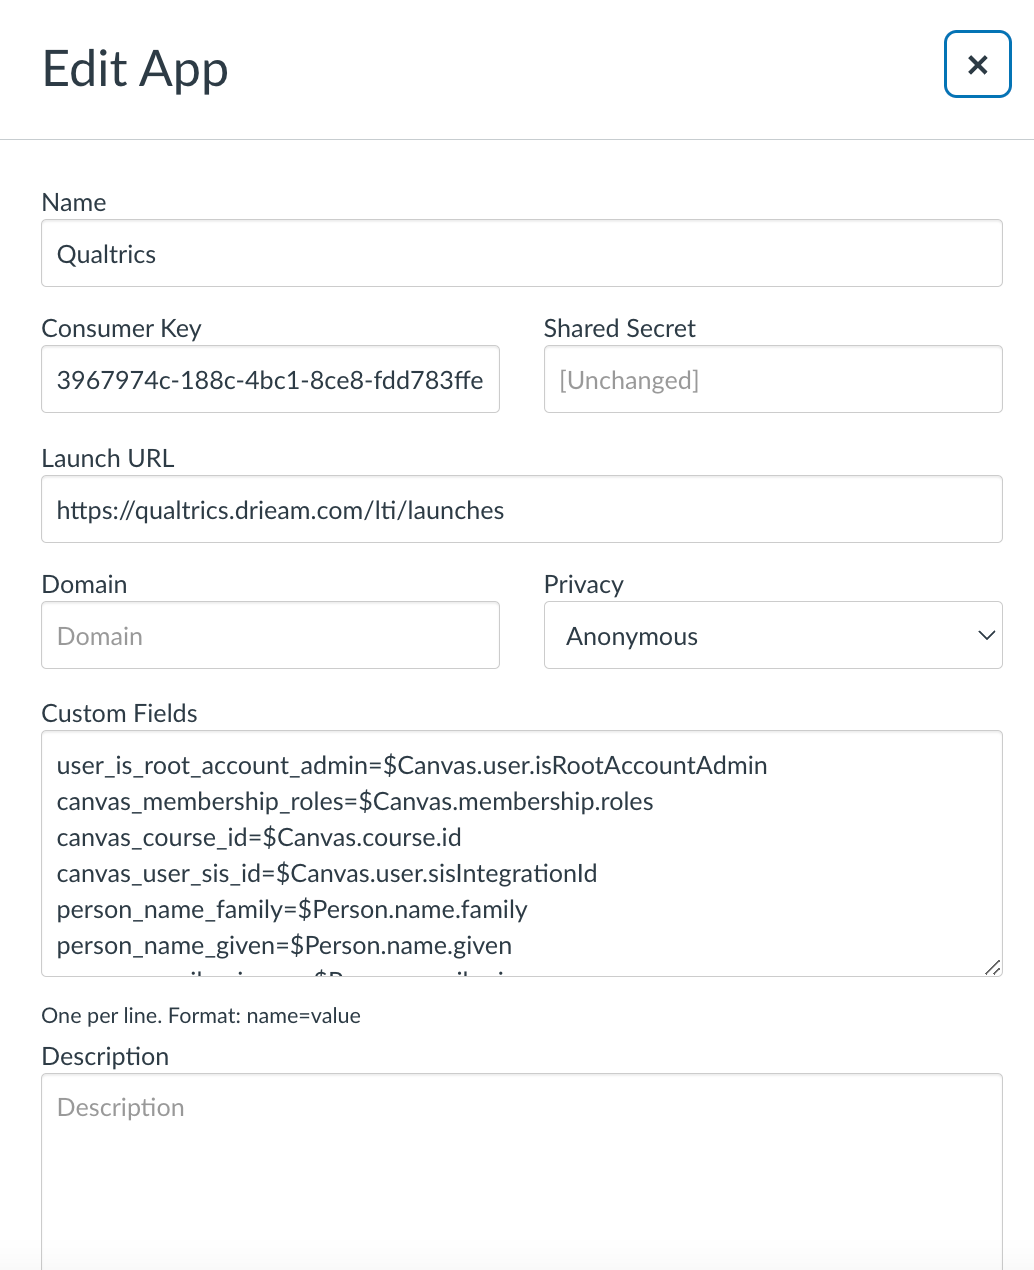
Finally, we want to add person_address_timezone=$Person.address.timezone in the Custom fields overview. You can simply go to the bottom of the Custom fields section and paste it underneath the last line.
You should now be good to go! If this is a little too complex or it is giving you issues, please contact support@drieam.com and we will help you set it up!
3. How do I create a bulk survey?
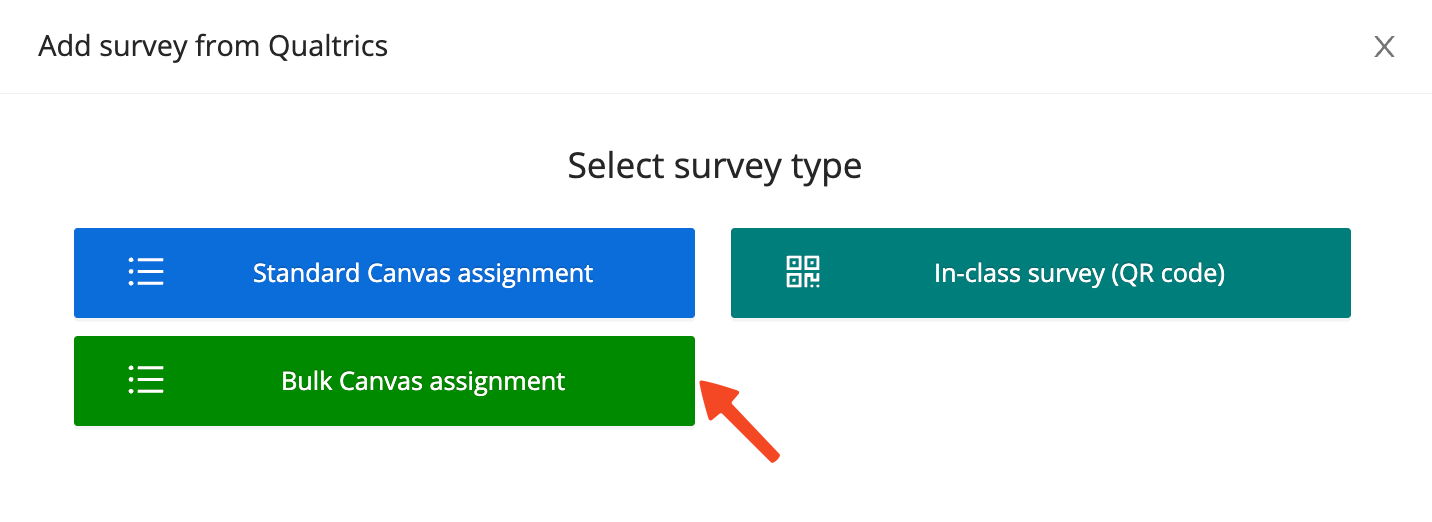
It is important to know that just as with the Standard Canvas Assignment, we first need to add the survey from Qualtrics into Canvas. From there we can distribute the desired survey as an assignment in bulk.

Once you are able to select the survey type, go ahead and select the bulk survey.
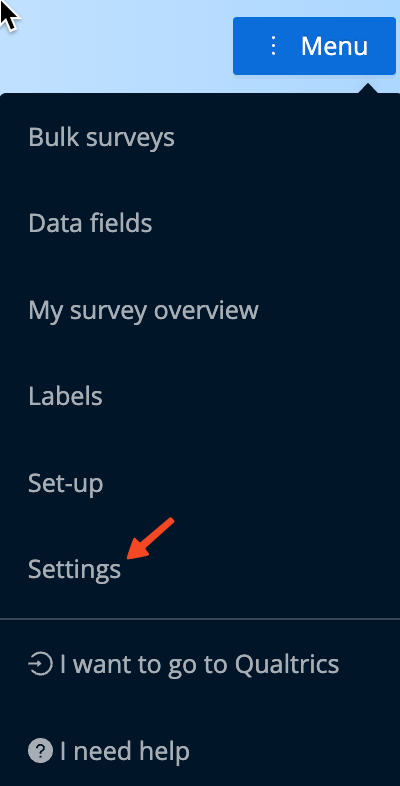
Once you have done that, you are now ready to distribute the survey in bulk. Go to your institute surveys and click on the Menu button on the top right corner.

Once the dropdown menu appears please select the Settings option (see the image bellow).
 | Now you are in the Qualtrics LTI admin settings page. You can enable the bulk survey easily by turning on the blue switch right here: |

Once you have enabled bulk surveys on the settings page, you will find 'Bulk surveys' under the 3-dot menu button.
The next step is to add the time zone. To add the timezone to the app you will have to go to 'Settings' in your admin navigation of Canvas. Setting the timezone is important because all the reminders, announcements and most importantly publishing date will be based on the timezone that you have selected. Once on the settings page, you can find 'Apps' as one of the tabs. |

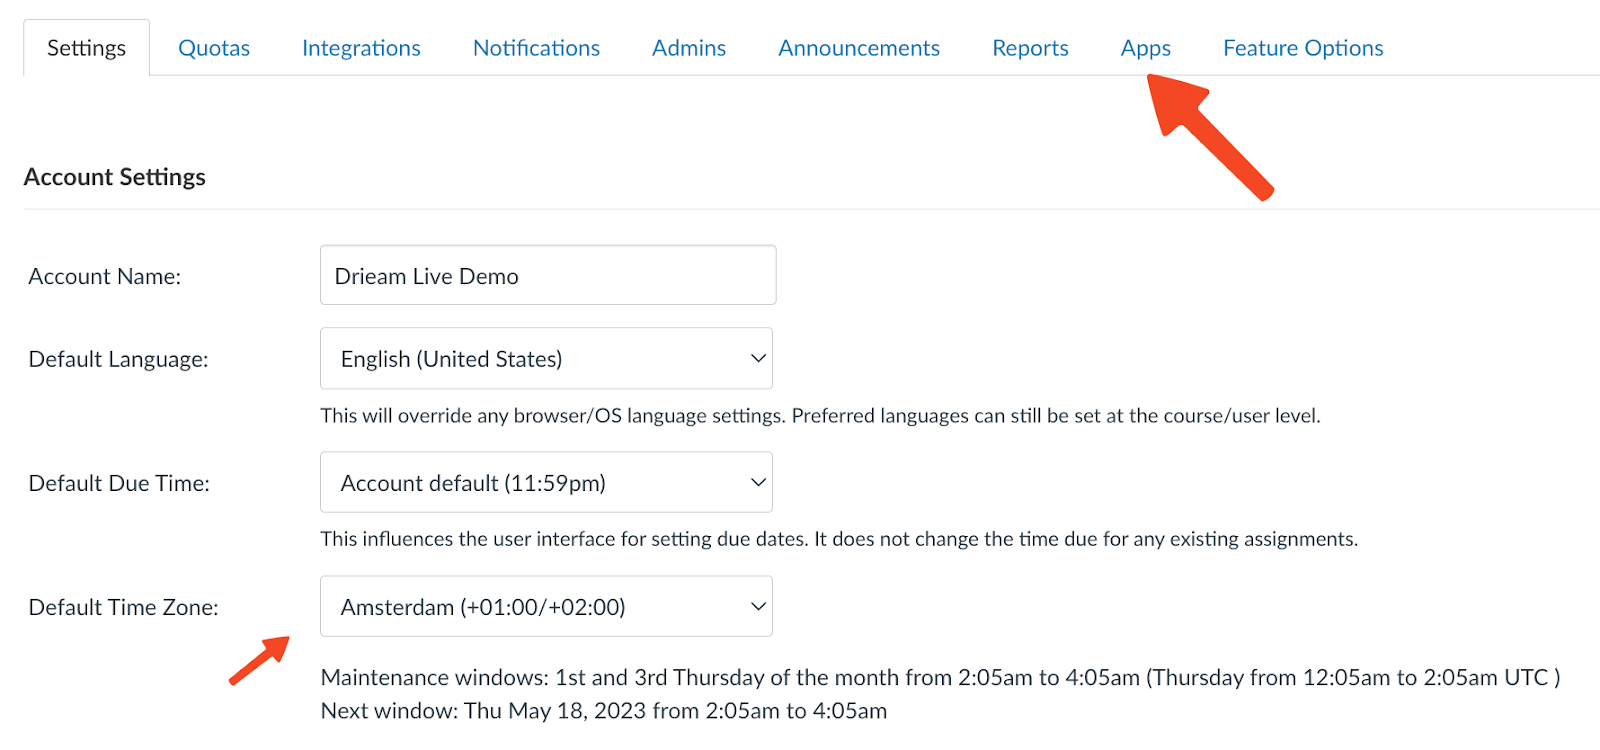
Clicking on it will give you an overview of all your installed apps, including the Qualtrics integration. The next step is to click on the gear icon on the right.

This will give you a dropdown with an 'Edit' option. When you click this, it will bring you to the settings of the app.

Finally, we want to add person_address_timezone=$Person.address.timezone in the Custom fields overview. You can simply go to the bottom of the Custom fields section and paste it underneath the last line.
3. How do I create a bulk survey?
It is important to know that just as with the Standard Canvas Assignment, we first need to add the survey from Qualtrics into Canvas. From there we can distribute the desired survey as an assignment in bulk.

Once you are able to select the survey type, go ahead and select the bulk survey.

Once you have done that, you are now ready to distribute the survey in bulk. Go to your institute surveys and click on the Menu button on the top right corner.

Then go ahead and click the Bulk Survey Option. See the image below:

Now you are at the bulk survey page! This is where you can manage and check the status of the bulk surveys you have.
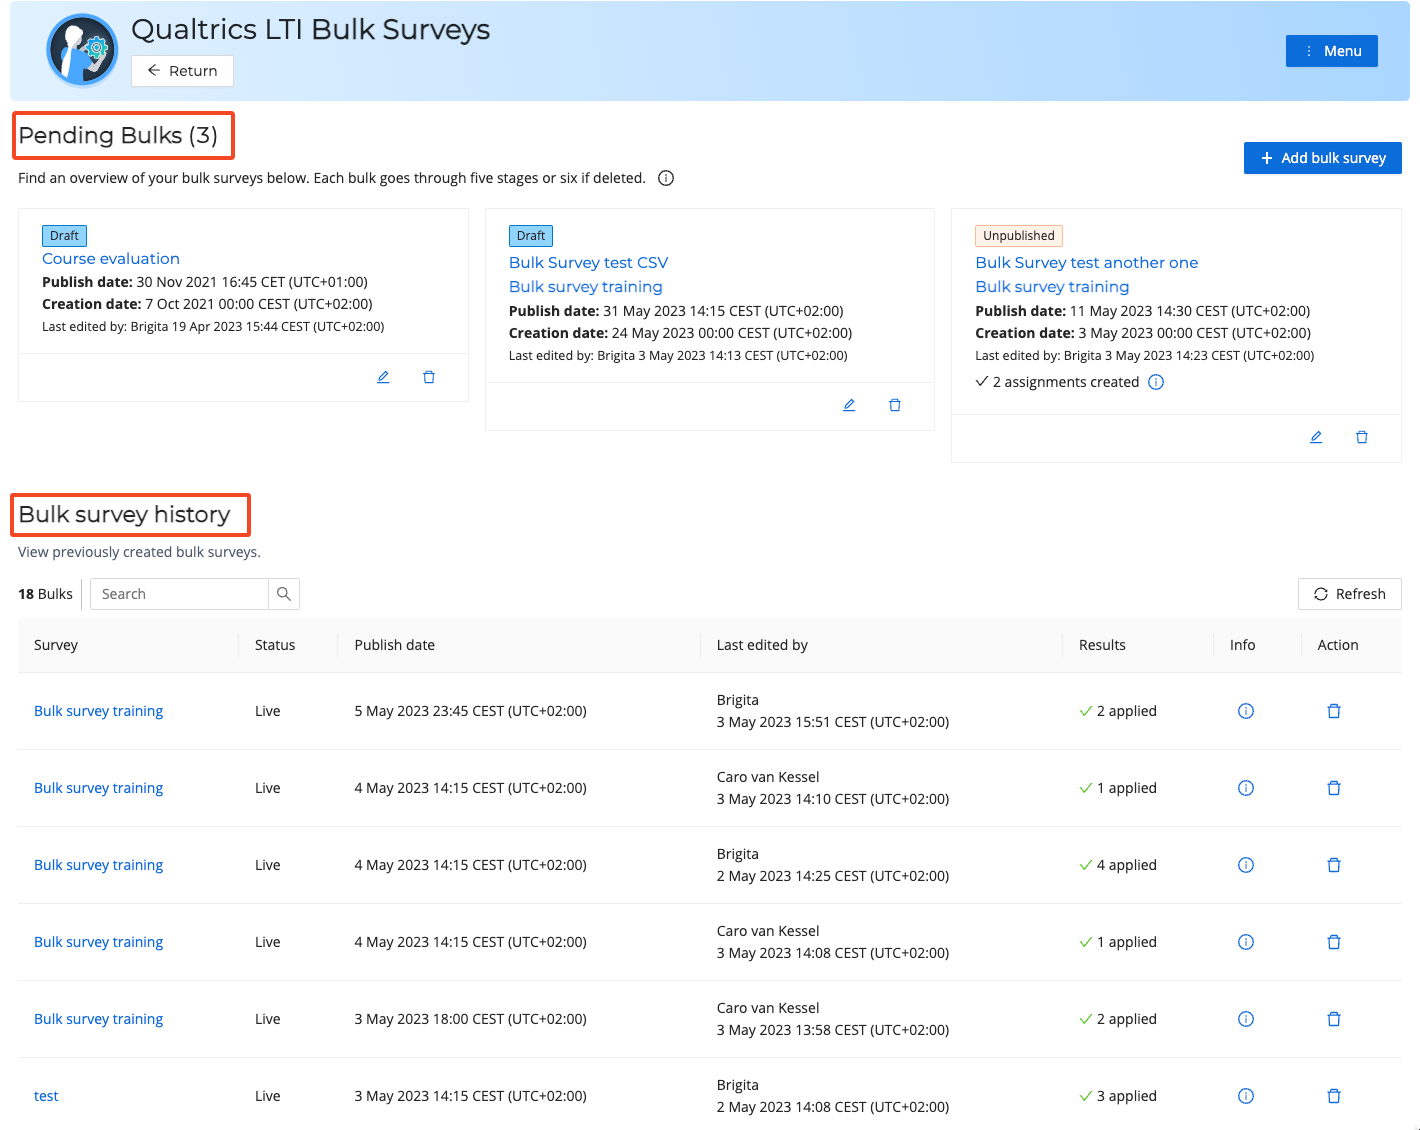
Pending bulks - these are the surveys that are not live yet. They can have the status "draft", "validated", "creating", "unpublished" or "publishing".
Bulk survey history - here you can find all the bulk surveys you have published These bulk surveys can have the status “live” or “closed”.
To add a new Bulk Survey, you can use the blue “Add bulk survey” button on the top right corner.
We have 6 steps to configure before we can schedule or publish the new bulk survey.
Step 1 of 6: Choose a survey
Very simple but important is to choose the right survey that you wish to be published in multiple canvas courses. If your survey does not show up here please make sure that it is of type "Bulk Canvas Assignment".
Step 2. of 6: Select courses
Select the courses you will publish the survey to. Please be aware you either only publish the surveys in regular Canvas courses or the blueprint courses. It is not possible to combine both types.
In case you would only like to use Canvas blueprint courses you can enable it by pressing this slider.

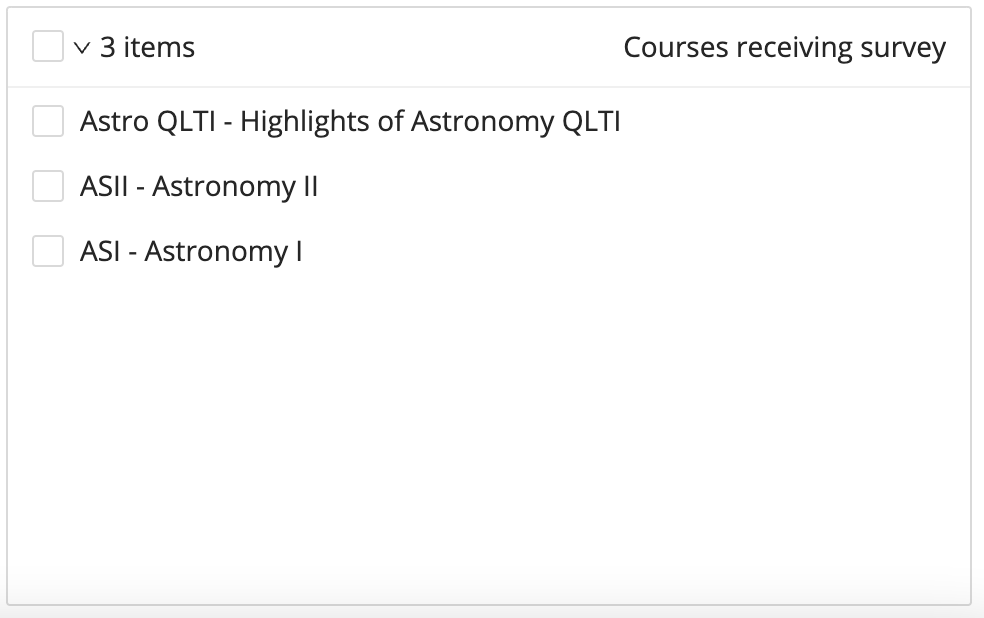
You can find the courses that you would like to use by the Course Name tab. You are also able to search by the course code or term, whichever is more convenient for you. In order to select the course, please check the box in front of the desired course and add it to the Courses receiving survey box.

Once you selected the courses it should look like this:
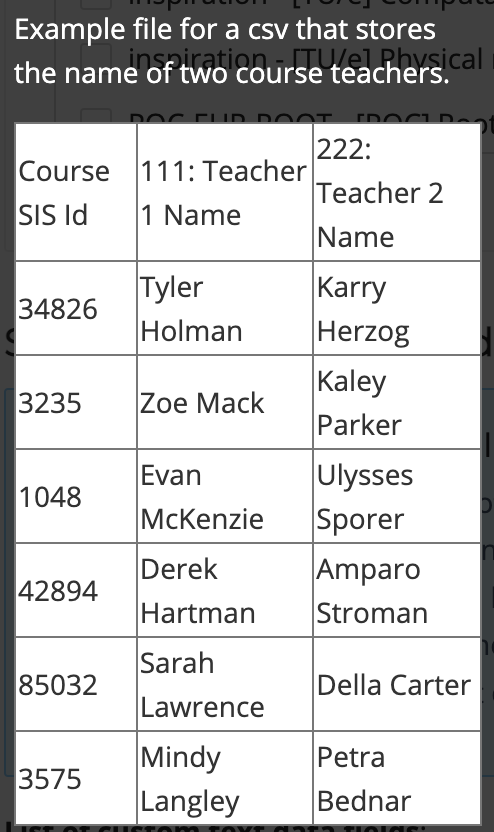 | As you know from Standard Canvas Assignments, we have “fixed” and “selection” embedded data fields. Since we are using Bulk surveys we will not be able to add the selection data fields, but instead of that we can use the Custom text and upload the CSV file. A CSV file is needed in order to add the embedded data fields to each course in the different surveys. For each of the courses selected at step 2 you can add a row and include course ID or SIS ID in the first column. The rest of the columns, one per data field, should contain the desired value for every course. The headers have to be included. The first one indicated the selected course id type (Course SIS Id or Canvas Course Id, respecting the case), and the rest have to include the id and qualtrics name of every data field separated with a colon (you can see the example file on your left). |
Please do not forget to select the right CSV delimiter. For the customers who are launching their Canvas in Europe please select the Semicolon option. In case you are located in the USA or anywhere outside of Europe, please use Comma.
In case you do not have Excel on your device we would recommend to use Text Editor, see what delimiter is showcased, and use that one as it is displayed in Text Editor.
In order to generate the CSV file please press this button.
Once you have done that and added all the values in, for example the instructor names, you are ready to upload the CSV. Just press the Upload CSV file button.
In case there is any issue with your CSV file or the CSV delimiter you will be able to see that the file uploaded is red. Once you hover over the i item you will find more information on the issue.
Step 4 of 6: Canvas Assignment details.
Here you are able to define the details of the Canvas assignment where the survey will be placed into. All bulk surveys will appear in an assignment group in the courses you have selected.
Start step 4 by giving the Assignment a name and assigning points:

Just as with Standard Canvas assignments, in case you would not like this assignment to be counted towards the final grade, please enable this field:

After that you will be able to configure your assignment due date and availability date, which is exactly the same settings as you have seen while uploading the Standard Canvas Assignments.
Step 5 out of 6: Notifications
Here you will be able to set announcements and reminders. Announcements will be one for everyone in the courses announcing that the assignment is available for completion.

You can also change the announcement title as well as the announcement message and insert the survey link.
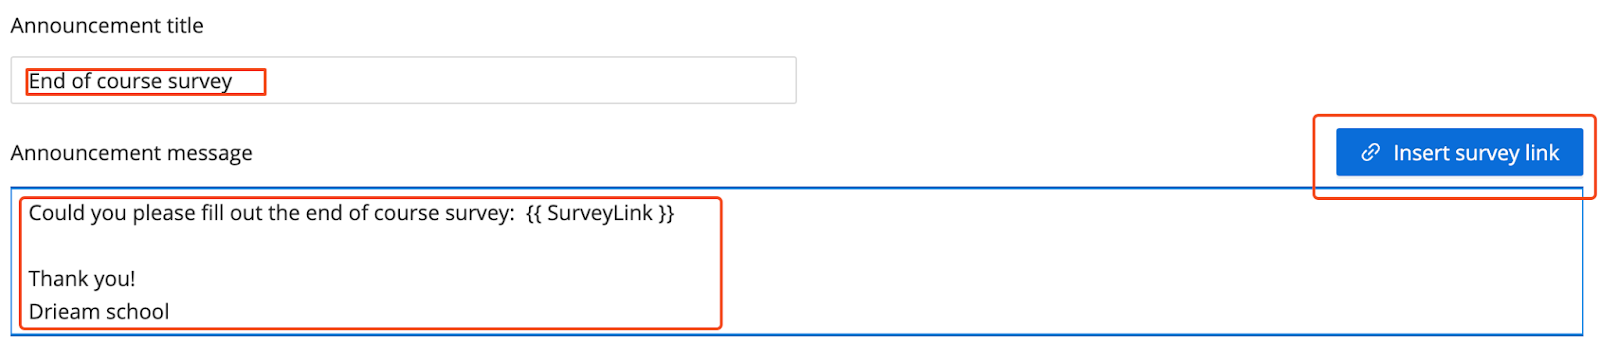
Reminders - you can set up to 5 reminders and just as with the announcements you can adjust the title and the message to your liking.

Step 6 out of 6: Schedule creation and publication
Select which time and date the assignments with the survey will be created. Secondly, you decide when these assignments will be published and therefore available for course participants. You will be able to see the timezone that you are in.
Tip! We recommend that you schedule the creation and publication outside of regular office hours as these activities can be demanding on your Canvas environment.

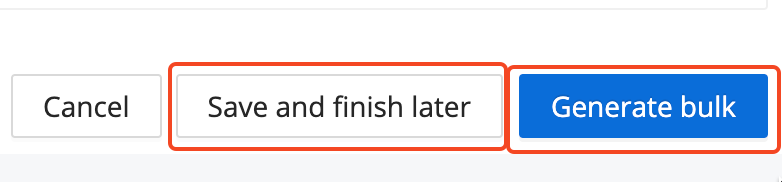
After that you can either save and finish later or generate the bulk.
Congratulations, you have finished all the steps!
Once the survey is published, you will be able to see all 7 steps that the surveys have gone through before it was published.
Draft: The bulk survey has been set-up, but nothing has happened yet. This is a safe stage to make changes.
Validated: The bulk survey has been validated and assignments will be created when the creation date is reached.
Creating: The assignments are currently being created in Canvas.
Unpublished: All assignments have been placed in courses, but the assignments are not yet available for course participants.
Publishing: All assignments are currently being published in Canvas.
Live: All assignments have been published and are therefore available for course participants.
Closed: All assignments have been removed from the corresponding courses. The bulk survey is still saved in history.
In case you have any questions please feel free to send us an email here.
Was this article helpful?
That’s Great!
Thank you for your feedback
Sorry! We couldn't be helpful
Thank you for your feedback
Feedback sent
We appreciate your effort and will try to fix the article